What is a load balancer?
Load balancers distribute incoming client requests to computing resources such as application servers and databases. In each case, the load balancer returns the response from the computing resource to the appropriate client.
Why use a load balancer?
- Preventing requests from going to unhealthy servers
- Preventing overloading resources
- Helping to eliminate a single point of failure
This introduction is enough to get started.
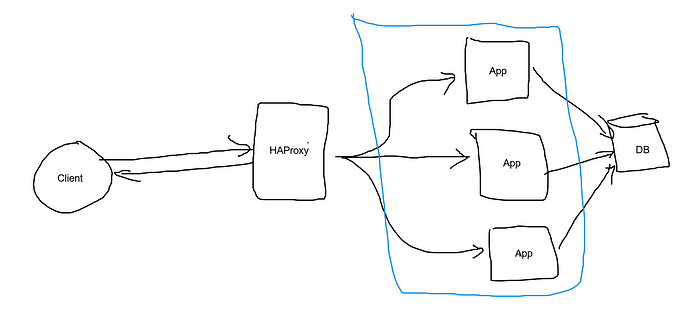
For this tutorial, we are going to use HAProxy which is a free, very fast, and reliable solution offering high availability, load balancing, and proxying for TCP and HTTP-based applications.
We are not going to create a Node.js application here. For this tutorial let’s say you have a node.js application up and running on localhost:3000
When clients hits the server on localhost:3000 the server returns the appropriate response. Now let's say if we start sending a lot of requests to this single server, the server will get overloaded and the response time will decrease. Also if this server crashes client won’t be able to get the response. That means currently our app is not scalable and is not highly available.
There are two ways to address the scalability issue, we can allocate more resources such as ram to handle more user in less response time. That's called Vertical Scaling. The second approach would be to create multiple instances of your server and distribute the requests between them. This is known as Horizontal Scaling.
Now you may be wondering how effectively distribute the requests between those servers. This is where you can use HAProxy.


Now let's set up the HAProxy.
- Install HAProxy in ubuntu
sudo apt-get update
sudo apt-get install haproxy
2. Configure the HAProxy
sudo nano /etc/haproxy/haproxy.cfg3. Put this configuration in the haproxy.cfg
defaults
        log     global
        mode    http
        option  httplog
        option  dontlognull
        timeout connect 5000
        timeout client  50000
        timeout server  50000
        errorfile 400 /etc/haproxy/errors/400.http
        errorfile 403 /etc/haproxy/errors/403.http
        errorfile 408 /etc/haproxy/errors/408.http
        errorfile 500 /etc/haproxy/errors/500.http
        errorfile 502 /etc/haproxy/errors/502.http
        errorfile 503 /etc/haproxy/errors/503.http
        errorfile 504 /etc/haproxy/errors/504.httpfrontend localnodes
    bind *:80
    mode http
    default_backend nodesbackend nodes
    mode http
    balance roundrobin
    option forwardfor
    http-request set-header X-Forwarded-Port %[dst_port]
    http-request add-header X-Forwarded-Proto https if { ssl_fc }
    option httpchk HEAD / HTTP/1.1\r\nHost:localhost
    server app01 127.0.0.1:3000 check
    server app02 127.0.0.1:3001 check
    server app03 127.0.0.1:3002 checklisten stats
    bind :9000
    stats enable
    stats uri /
    stats hide-version
    stats auth someuser:password
4. Restart the HAProxy
sudo service haproxy restartNow go to localhost:9000 and you should be able to view the HAProxy statistics dashboard after providing username and password.


As you can see app01, app02 and app03 are showing as down.
Now go ahead and start your node server on localhost:3000, and two more servers on localhost:3001 and localhost:3002.
As soon as you start the server you can see the status on the HAProxy statistics dashboard.


Now let’s send some requests to our load balancer, we don’t need to call localhost:3000 or localhost:3001 we can just hit on localhost since HAProxy running on port 80.
The load balancer should be able to get the requests and forward it to node.js servers using the Round Robin algorithm.
Create a script and make 10000 requests to your server. And you will be able to see that the requests have been balanced between these three servers.
This ensures that you will be able to handle the requests even if one of your servers goes down.


As you can see above the 10,000 requests have been distributed effectively between the three servers.
You can choose your own algorithm for load balancing, lets try the Weighted Round Robin algorithm.
Update your haproxy.cfg with:
backend nodes
    mode http
    balance roundrobin
    option forwardfor
    http-request set-header X-Forwarded-Port %[dst_port]
    http-request add-header X-Forwarded-Proto https if { ssl_fc }
    option httpchk HEAD / HTTP/1.1\r\nHost:localhost
    server app01 127.0.0.1:4321 weight 5 check
    server app02 127.0.0.1:4322 weight 3 check
    server app03 127.0.0.1:4323 weight 2 check
Here we have given the weight to each server. The app01 server has a weight of 5, app02 has 3 and app03 has 2.
Now let's see this in action, fire 10,000 requests, and see the statistics.


Now as you can see the requests have been distributed as per the weight to three servers.
app01: 5000
app02: 3000
app03: 2000
You can use different load balancing algorithms as per your need.
If you are interested in System Design, also read how to setup Nginx as a reverse proxy here.
https://blog.shashi.dev/2021/01/setting-up-nginx-as-reverse-proxy-for.html
Thanks for reading. If you have some feedback, please provide your response or reach out to me on Twitter or Github.
Happy Coding!!!
Comments
Post a Comment