
In this post, we are going to build a RESTful CRUD API with Deno, Oak and MongoDB as database.
In the previous article, we discussed how to install deno in your local machine and start using Deno. If you haven’t read that article, please read the article below and install the deno first.
After installing the Deno, we will start building the restful crud api’s. We will use oak microframework.
Some of the other deno microframeworks are:
In this article we will be using oak, which is inspired by koa.
Setting up the project:
- Create a new directory called restful-api-deno
mkdir restful-api-deno2. After creating the directory just cd into the directory
cd restful-api-deno3. Create a new file server.ts and paste the following code init.
import { Application } from "https://deno.land/x/oak/mod.ts";const app = new Application();
const port: number = 8000;app.use((ctx) => {
    ctx.response.body = "Hello World!";
});console.log('server is running on port ', port);
await app.listen({ port });
4. Let's fire up the server….
deno run --allow-net server.ts5. The server will be started and you should see the following output:
Check file:///home/nineleaps/personal/restful-api-deno/server.ts
server is running on port  8000
Creating RESTful CRUD API
We will be creating create, read, update and delete API for users resource.
POST /users Create a new user
GET /users Get list of user
PUT /users/:id Update a particular user
DELETE /users/:id Delete a particular user
- Create a new directory called
routesand create a fileuser.ts
mkdir routes
cd routes
2. In the routes/user.ts file paste the following code.
import { Router } from "https://deno.land/x/oak/mod.ts";

const router = new Router();// controller
import userController from "../controllers/user.ts";

router
  .get("/users", userController.get)
  .post("/users", userController.create)
  .put("/users/:id", userController.update)
  .delete("/users/:id", userController.delete);

export default router;
3. Now let's go ahead and create a controller for our routes.
In the same root folder create a new directory called controllers and create a new file user.ts
4. In the controllers/users.ts file paste the following code.
export default {
  create: async () => {},
  get: async () => {},
  update: async () => {},
  delete: () => {},
};
For now, this is just a skeleton where we are just exploring 4 functions that we used in the route/user.ts file.
So far you might have realized there is some familiarity with Node.js and express if you have work with node.js before.
5. Finally open server.ts and make the following changes:
Import route in server.ts
// routes
import userRouter from "./routes/user.ts";
Next step is to use this router, final server.ts will like:
import { Application } from "https://deno.land/x/oak/mod.ts";
// routes
import userRouter from "./routes/user.ts";const app = new Application();
const port: number = 8000;app.use(userRouter.routes());
app.use(userRouter.allowedMethods());app.use((ctx) => {
    ctx.response.body = "Hello World!";
});console.log('server is running on port ', port);
await app.listen({ port });
Connecting with MongoDB
- Create a new file called
db.tsand paste the following code.
import { MongoClient } from "https://deno.land/x/mongo@v0.21.2/mod.ts";const client = new MongoClient();
await client.connect("mongodb://localhost:27017");// Defining schema interface
interface UserSchema {
    _id: { $oid: string };
    name: string;
    email: string;
}const db = client.database("restful_api_deno");const User = db.collection<UserSchema>("users");export { User };
Here we are using MongoClient to connect with MongoDB database. We have specified database name as restful_api_deno and collection named users
So now we have glue server, routes, and controller and database, but our routes are with empty functionality. So let’s add some functionality to the controller.
Create User
Let’s add code to create a new user in the controller create function.
import { User } from "../db.ts";export default {
    create: async (context: any) => {
        try {
            // Get the body from request
            const body: any = await context.request.body();
            // Get the fields from body
            const { name, email } = body.value;            // Insert the data into the database
            const id = await User.insertOne({
                name: name,
                email: email
            });            // Send the response
            context.response.body = {id};
            context.response.status = 201;
        } catch (error) {
            context.response.body = error;
            context.response.status = 500;
            console.log(error);
        }
    },
    get: async () => { },
    update: async () => { },
    delete: () => { },
};
Start the server
deno run --allow-net server.tsTesting the create user API using Postman.

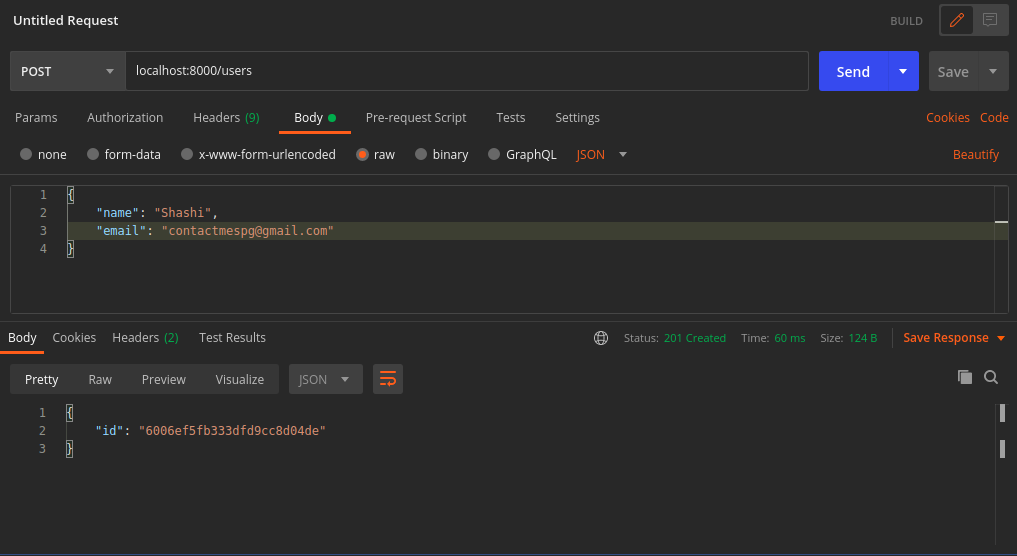
Provide the name, and email in the json format in postman and hit the POST /users API. If everything works correctly user will be created in db and the created id will be returned in the response along with status code 201.
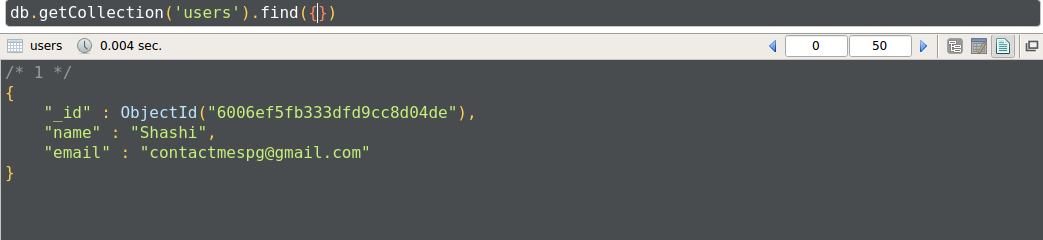
You can check the db that there is a document created.

Lets finish up the rest of the API.
import { User } from "../db.ts";export default {
    create: async (context: any) => {
        try {
            // Get the body from request
            const body: any = await context.request.body();
            // Get the fields from body
            const { name, email } = await body.value;            // Insert the data into the database
            const id = await User.insertOne({
                name: name,
                email: email
            });            // Send the response
            context.response.body = { id };
            context.response.status = 201;
        } catch (error) {
            context.response.body = error;
            context.response.status = 500;
            console.log(error);
        }
    },
    get: async (context: any) => {
        try {
            // Fetch the data from the database
            const users = await User.find({});            // Send the response
            context.response.body = users;
            context.response.status = 200;
        } catch (error) {
            context.response.body = error;
            context.response.status = 500;
            console.log(error);
        }
    },
    update: async (context: any) => {
        try {
            // Get the id
            const id: string = await context.params.id;
            // Get the body from request
            const body: any = await context.request.body();
            // Get the fields from body
            const { name, email } = await body.value;            // Insert the data into the database
            const result = await User.updateOne({
                _id: id,
            }, {
                $set: {
                    name: name,
                    email: email,
                }
            });            // Send the response
            context.response.body = { result };
            context.response.status = 201;
        } catch (error) {
            context.response.body = error;
            context.response.status = 500;
            console.log(error);
        }
    },
    delete: async (context: any) => {
        try {
            // Get the id
            const id: string = await context.params.id;            // Delete the data from the database
            const result = await User.deleteOne({
                _id: id,
            });            // Send the response
            context.response.body = { result };
            context.response.status = 204;
        } catch (error) {
            context.response.body = error;
            context.response.status = 500;
            console.log(error);
        }
    },
};
We finished the CRUD functionality in our deno app. You can test the other API’s too using Postman.
If you want to check out the code, you can find the source code in Github.
Home | Casino | Jordan12-Retro
ReplyDeleteThe ultimate in online gambling, Jordan12 was built to meet the air jordan 18 retro order needs of the most website to buy air jordan 18 retro red suede discriminating and experienced sports bettors. air jordan 18 retro order It is a air jordan 18 retro varsity red online free shipping place to gamble in 사설 스포츠토토 샤오미 and out
Players from Canada have entry to the complete vary of merchandise and can easily swap between the on line casino and the sportsbook. Some of the most well-liked sports on Spin Sports are soccer, hockey, basketball, soccer, and tennis. Withdrawing funds can also be|can be} quite simple, thanks to the many options obtainable. Where possible, payouts are processed by way of the same strategies used for deposits to provide a closed loop for more safety. After making the primary deposit, you’ll be automatically enrolled 토토사이트 within the Loyalty Programme at Spin Casino. You'll accumulate Loyalty Points for free with every actual cash guess positioned on the site.
ReplyDelete